
How I Use Dubsado to Manage My Business

Last January I started using Dubsado to get organized before I launched the Dana Gray Studio website in March. I have dubbed March 13th as my business’ start date since that’s when everything went live on the Internet (so official).
This wasn’t my first rodeo, so I knew a bit about what I should accomplish behind the scenes before networking, reaching out to potential clients, and really getting my new business off the ground. Processes and organization is the back bone of any service business, so that’s what I focused on first.
Enter in Dubsado, and things have never been better! This post will go through all of the core features of Dubsado that I love and use almost DAILY.
If you’re looking for a new client management system and a way to get organized, I dare say that you will absolutely LOVE this one! And the best part is, you have a free trial account until you enter in more than 3 clients.
I used the free account for a good while, just adding one of my other emails as a “test client” so I could get the hang of how to create projects and organize everything before I put it into action. (It’s good to know how to run your own programs before you make other poor souls suffer.)
Here’s the short version of why I chose Dubsado to run my business:
1. I needed a better way to organize my clients and projects.
Using Dubsado as a glorified address book is worth the membership to me. You can add any client information, all the way from their email address to social media links to custom mapped fields that you set up yourself. (For example, I have a custom mapped field titled “Referred By” to keep track of and send out little gifts to let clients know I appreciate their support.)
This is what it looks like when you create a new project in Dubsado:
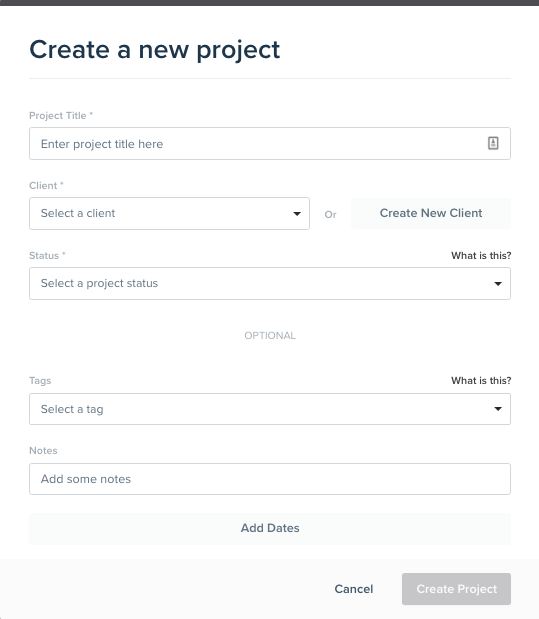
Super nice and clean, right? Let’s break down what you see when you add a project even further:
Project Title
Exactly what it says it is. You can search by project name to get to it quickly. If you activate the “Client Dashboard” for your clients, they will see the project title you have added, so make sure it’s something you aren’t embarrassed by.
Client
You can choose from your client address book here, or also create a brand new client (which you can go back and add all their details to later).
Status
One of my favorites! Dubsado ultimately breaks down projects into two segments: “Leads” (for me, this means a potential client that is just receiving info) or “Jobs” (for me, this means a client that has paid a deposit to be able to start on the project or go to the event). Under “Leads” or “Jobs”, you can break it down even further with custom “project statuses”.
I have a custom project status for each step in my “Leads” workflow, including: to reach out, lead capture form received (this is just the contact form on my website), questionnaire sent, scheduled call/meeting, proposal sent, follow up sent, unresponsive email sent, and then I tag it with a “interested, no budget, whatever other reason they didn’t book”. For my “Jobs” workflow there are just two project statuses: current projects, past projects.
Tags
I tag each project as whatever type of service I’m providing: branding, website design, website maintenance, product photography, event photography, etc. You get the idea. It’s super helpful to be able to sort by categories when looking at an entire long list of past projects.
Notes
These are just notes for the specific project you’re in. Your client won’t see these.
Add Dates
You can choose a start and end date for a project (if it’s for a branding project that takes a couple weeks), or just have one date (if it’s something like an event you are attending).
2. I needed help with mundane tasks.
Dubsado can be as automated as you want it to be. For most people, the automation is either a love it or hate it feature. And the only reason people hate it is because it does take a while to set up everything to work smoothly for you. To use all of the automations and workflows, you HAVE to know your own business inside and out. You have to know the processes for each service you offer or type of project you do. You have to set guidelines for how and when you get paid. You have to have a routine basically.
The Dubsado help docs can point you in the right direction when it comes to setting up workflows and best practices. The Dubsado team even offers workflow set-up as a service! Super nice people, don’t hesitate to reach out to them!
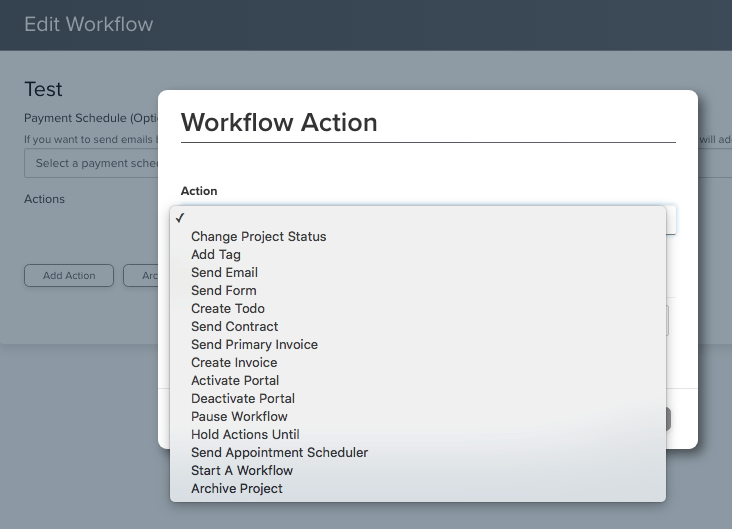
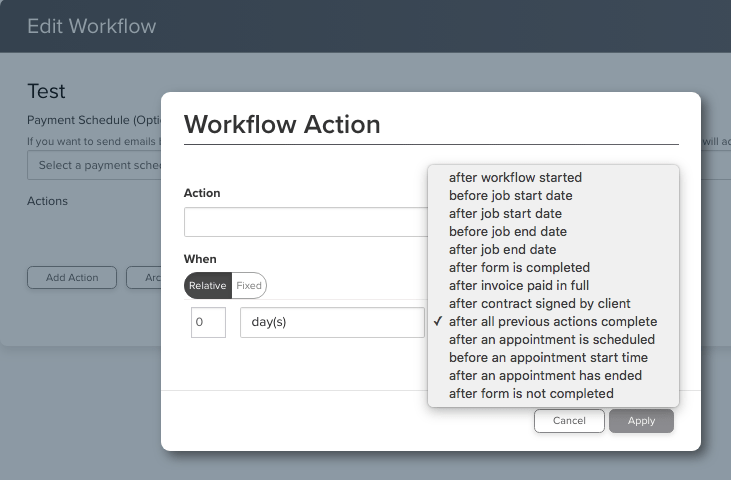
Below is what you see when you are adding a new workflow action. SO many options to choose from.
3. I needed a place to store contracts, invoices, and other documents.
This is one of the most important features for me. For every project I create under a client, it ALWAYS has a contract tied to it. I have a service based business so I have to make sure I’m covered legally, even if I’m just working for a friend or family member.
There is a section in Dubsado that houses templates for every single contract, questionnaire, project proposal, contact form, and service package I have created. When you’re creating projects under clients, you can apply a “copy” of whatever form you need to that project and all of the details will automatically be filled out for that client (if you are using smart fields). It saves time and sanity.
To make things easier on your client, all of these documents can also be found in their Client Dashboard for reference (if you have it activated for their project).
4. I needed something to track my time.
For about half of my services, I have set package prices. For the other half, I work and charge clients hourly. Using the time tracking feature within Dubsado is super beneficial if you track time hourly.
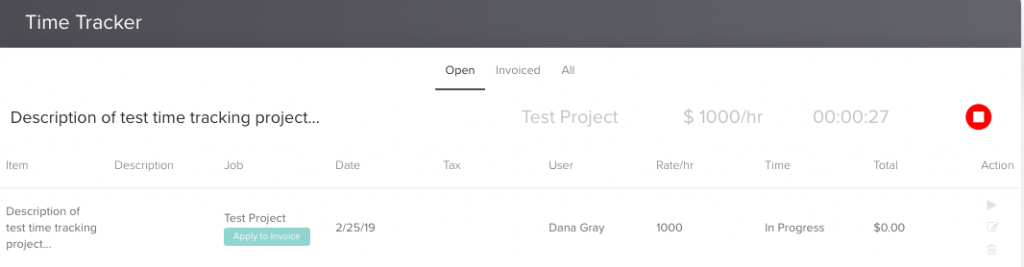
You can enter in different tasks for what you’re working on, choose a job / project to tie it to, and choose an invoice within that job / project to tie it to. The time spent on a task tracks in real-time and you just click the red stop button when you’re finished working on it. Once you do that, the total price will update based off of the hourly rate you have entered. You can also assign the tracked time a category (again, I have categories for each service I offer so I can know where I’m spending the most of my time).
5. I needed basic income & expense reporting.
In Dubsado’s side toolbar, you can access the Accounting features. A list of invoices to see oustanding / unpaid / paid, a list of every single transaction you have entered into Dubsado, a Chart of Accounts, and of course, reports.
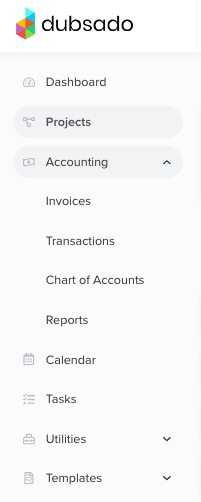
Some people choose to integrate the other accounting apps they use (like Quickbooks), but the Dubsado transactions does actually help a lot for those that don’t have other robust accounting software.
You can enter in expenses, income, tax payments and categorize all of those by dates, jobs, clients, etc. If you’re a real stickler for keeping track of your money, you could even create a workflow for post-project to remind you to log all expenses incurred after the fact (like travel, food, client meetings, etc.)
If you’re starting to fall in love with the way Dubsado sounds, feel free to leave a comment below if you have more questions (or more importantly, chat up the Dubsado team)! I only skimmed the surface of all the amazing features Dubsado has. They’re always listening to their customers and adding more features as necessary!
Click this link to sign up for a free trial and get 20% off your first month!
This is awesome! We love seeing how Dubsado works best for our customers! Thank you for spreading the word.
Thank you for creating a wonderful product!